
Learn the art of Drawing:6ya5lsy38aw= Pumpkin with this comprehensive guide. From basic shapes to detailed shading, this post covers everything you need to know to create beautiful pumpkin drawings.
Introduction
Drawing:6ya5lsy38aw= Pumpkin is a delightful and creative activity enjoyed by artists of all skill levels. Whether you are a seasoned artist or just starting, the process of drawing a pumpkin offers numerous opportunities for learning and fun. In this comprehensive guide, we will dive into the step-by-step process of drawing a pumpkin, exploring everything from basic shapes to intricate details. So, grab your pencils and let’s embark on this artistic journey together!
Understanding the Basics of Drawing Pumpkin
To begin drawing a pumpkin, it is essential to grasp the basic form and structure. A pumpkin is generally round, with slight variations in its shape. At its core, the pumpkin’s body consists of a large oval or circular shape, which serves as the foundation for further details. By starting with this simple form, you will set yourself up for success as you move on to more complex aspects.
Materials You Need for Drawing Pumpkin
Before you begin your drawing, gather the right materials. A good pencil, eraser, and paper are essential. You may also want to use colored pencils or markers to add color. For beginners, a simple sketchbook is ideal. For more advanced artists, specialized drawing paper can offer a better texture.
Sketching the Outline of Your Pumpkin
The first step in drawing pumpkin is sketching the outline. Lightly draw an oval shape on your paper, making sure it’s not too perfect. Pumpkins are naturally uneven, and this adds to their charm. Keep your lines soft, as you’ll be refining them later.
Creating the Vertical Ridges on Your Pumpkin
Once the basic shape is established, it’s time to add the pumpkin’s iconic vertical ridges. Starting at the top center of the pumpkin, draw curved lines that flow downward, spreading out as they reach the base. These ridges give the pumpkin its recognizable texture.

Drawing the Stem of Your Pumpkin
Next, focus on the stem, which sits at the top of your pumpkin. The stem is often thick and slightly twisted, so don’t worry about making it symmetrical. Draw a short, curved cylinder-like shape, and add some uneven edges to make it appear more natural. The stem will add character to your drawing.
Adding Depth and Dimension to Your Pumpkin
To make your pumpkin look more realistic, consider adding some depth and dimension. One effective way to do this is by using shading techniques. As you draw the ridges, shade the areas where the pumpkin curves inward, creating a sense of volume and depth. This step is crucial for bringing your pumpkin to life.
Enhancing the Texture of Your Pumpkin
A pumpkin’s surface is not smooth; it has a unique texture that can be challenging to capture. To give your drawing more detail, lightly sketch small lines and marks along the ridges and around the pumpkin’s body. These subtle details will enhance the overall texture and make your drawing more dynamic.
Perfecting the Shape and Proportions of Your Pumpkin
As you continue drawing pumpkin, pay close attention to the proportions. Make sure the ridges are evenly spaced and the shape of the pumpkin is balanced. If your pumpkin looks too round or too flat, adjust the shape by refining the lines. Taking the time to perfect these proportions will result in a more polished final drawing.
Experimenting with Different Pumpkin Shapes
While traditional pumpkins are round, there are many varieties with unique shapes. Feel free to experiment with different types of pumpkins in your drawings. For example, some pumpkins are taller and more elongated, while others are squat and wide. By trying out different shapes, you can add variety to your pumpkin drawings and expand your skills.
Adding Shadows and Highlights to Your Pumpkin
Shading is a crucial element in creating a realistic pumpkin drawing. Focus on where the light source hits the pumpkin and add shadows accordingly. The areas where the ridges dip inward will be darker, while the raised areas will catch the light. Additionally, adding a small highlight on the stem can give it a three-dimensional effect.

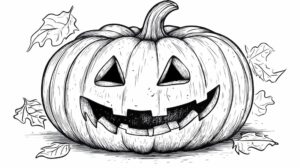
Drawing a Jack-o’-Lantern Face on Your Pumpkin
If you want to turn your pumpkin into a classic Halloween jack-o’-lantern, now is the time to add a face. Start by drawing simple shapes like triangles for the eyes and a jagged line for the mouth. The expression can be as friendly or as spooky as you like, depending on the mood you’re going for.
Adding Color to Your Pumpkin Drawing
Now that you have the basic shape and details of your pumpkin, it’s time to bring it to life with color. Start by coloring the body of the pumpkin a rich orange. Use a darker orange or brown to shade the ridges, and a lighter yellow for the highlights. For the stem, choose earthy greens or browns to match the natural look.
Experimenting with Different Art Styles for Your Pumpkin
As you become more comfortable with drawing pumpkins, try experimenting with different art styles. You can go for a more realistic approach by focusing on accurate shading and proportions, or you can opt for a cartoonish style with exaggerated features. Each style offers its own unique charm, and exploring different techniques will help you grow as an artist.
Drawing Pumpkins in Different Settings
To make your pumpkin drawings more interesting, consider placing your pumpkin in various settings. For example, you could draw a pumpkin in a rustic field with other autumn elements like hay bales and leaves. Alternatively, you could place your pumpkin in a spooky Halloween scene with bats, spiders, and a full moon. Adding a background can give your drawing more context and creativity.
Using References for Drawing Pumpkin
If you’re struggling with capturing the details of a pumpkin, using references can be incredibly helpful. Look at real pumpkins, either in person or in photos, to study their shapes, textures, and colors. Having a reference will guide you in creating a more accurate and realistic drawing. It’s always a good idea to use references to improve your drawing skills.
Drawing Pumpkins in Different Perspectives
To take your pumpkin drawing to the next level, try drawing it from different perspectives. A pumpkin viewed from above will look much different than one seen from the side. Practice drawing pumpkins at various angles to challenge yourself and enhance your understanding of perspective and depth.
Incorporating Other Elements with Your Pumpkin Drawing
Once you’ve mastered drawing a pumpkin, consider incorporating other elements into your composition. You can draw leaves, vines, or even a small woodland creature next to your pumpkin. By adding these elements, you can create a more dynamic and engaging scene that tells a story.
Troubleshooting Common Issues When Drawing Pumpkin
Every artist faces challenges, and Drawing:6ya5lsy38aw= Pumpkin is no exception. If your pumpkin looks too flat, focus on enhancing the shading to give it more volume. If the shape seems off, try refining the outline or using a reference. With practice and patience, you’ll overcome these challenges and create a beautiful pumpkin drawing.

Sharing Your Pumpkin Drawing with Others
After completing your Drawing:6ya5lsy38aw= Pumpkin, don’t be afraid to share your work! Whether it’s with friends, family, or on social media, sharing your art allows others to appreciate your creativity. Additionally, receiving feedback from others can help you improve your skills and gain new perspectives on your work.
Continuing to Practice Drawing Pumpkin
Like any skill, drawing takes practice. The more you Drawing:6ya5lsy38aw= Pumpkin, the better you’ll become at capturing their form and details. Don’t be discouraged if your first few drawings don’t turn out the way you envisioned. Keep practicing, experimenting, and learning, and you’ll see improvement over time.
Conclusion
Drawing:6ya5lsy38aw= Pumpkin is a rewarding experience that combines creativity, technique, and fun. Whether you’re drawing for Halloween, for a project, or just for fun, each pumpkin you create will bring you closer to mastering this delightful subject. By following the steps outlined in this guide and continuing to practice, you’ll be well on your way to creating beautiful pumpkin drawings.
Read Also: Economy Class:0ovsakuccbi= Singapore Airlines A Comprehensive Overview